Như các bạn đã biết hiện nay Blogspot đã cho ra Threaded comments mới, tuy nhiên giao diện còn khá đơn giản, nhìn không đẹp mắt lắm. Do vậy hôm đây mình sẽ giới thiệu cho các bạn Threaded comments đã được mình tùy biến trông đẹp hơn,bắt mắt hơn và đặc biệt là có thể phân bao nhiêu cấp tùy ý bạn.Đây cũng là yêu cầu của bạn Hồng Phi Lê .
1.Vào blogger > Mẫu > Chỉnh sửa HTML
2.CTR+F Tìm đoạn code sau :
<b:include data='post' name='comments'/>3.Thay toàn bộ đoạn code tìm được bằng code bên dưới ( có 4 lần thay hoặc nhiều hơn tùy templete )
<b:include data='post' name='threaded_comments'/>4.Lưu lại template
Tùy chỉnh Threaded Comments của blogger
Bước 1: Vào blogger > Mẫu > Chỉnh sửa HTML
Bước 2: Dán code bên dưới vào trước ]]></b:skin>
#comments h4{margin:15px 0 15px;line-height:1.4em;text-transform:capitalize;font-size:160%;box-shadow:0 1px 3px 0 #B5B5B5;-moz-box-shadow:0 1px 3px 0 #b5b5b5;-webkit-box-shadow:0 1px 3px 0 #B5B5B5;border:1px solid #DDD;border-bottom:4px solid #0F83A0;overflow:hidden;position:relative}- Đoạn code màu vàng chính là phần xác định phân cấp cho thread comment.
.comments .comments-content .comment,.comments .comments-content .comment:first-child,.comments .comments-content .comment:last-child{padding:5px;border:1px solid #CFCFCF;margin:0 0 5px;box-shadow:0 1px 3px 0 #B5B5B5;-moz-box-shadow:0 1px 3px 0 #b5b5b5;-webkit-box-shadow:0 1px 3px 0 #B5B5B5;border:1px solid #DDD;border-bottom:4px solid #0F83A0;overflow:hidden;position:relative}
.comments .avatar-image-container{max-height:50px;width:45px;height:45px;padding:2px;border:1px solid #BDBDBD}
.comments .avatar-image-container img{max-width:50px;width:100%}
.comments .comment-block{margin-left:52px;}
.comments .inline-thread .avatar-image-container{float:right;width:40px;height:40px}
.comments .inline-thread .comment-block{margin:0 50px 0 0}
.comments .comments-content .comment-header{padding:0 0 3px;border-bottom:1px solid #D8D8D8}
.comments .comments-content .comment-replies{margin:10px 5px 0}
.comments .comments-content .inline-thread .comment-content{padding:0 10px}
.comments .comments-content .icon.blog-author{position:absolute;right:10px;background-color:#5390ad;width:65px;height:20px;border-radius:0 0 3px 3px;top:-7px}
.comments .comments-content .icon.blog-author::before{content:"Admin";color:white;position:absolute;left:12px;top:3px}
.comments .comments-content .inline-thread .comment:first-child{margin-top:8px}
#comments-block{margin:1em 0 1.5em;line-height:1.6em}
#comments-block .comment-author{margin:.5em 0}
#comments-block .comment-body{margin:.25em 0 0}
#comments-block .comment-footer{margin:-.25em 0 2em;line-height:1.4em;text-transform:uppercase;letter-spacing:.1em}
#comments-block .comment-body p{margin:0 0 .75em}
.deleted-comment{font-style:italic;color:gray}
.comment-form{max-width:100%}
.comments .thread-toggle {
margin-bottom:10px;
}
.comments .comment-thread.inline-thread .comment .comment-block {
margin-left:52px;
}
.comments .comment-thread.inline-thread .comment {
margin:0px 0px 5px 30%; /* Level 6+ */
background-color:#f4f4f4;
border:1px solid #ddd;
padding:10px 15px;
color:#333;
}
.comment .comment-thread.inline-thread .comment:nth-child(6) {margin:0px 0px 5px 25%;} /* Level 6 */
.comment .comment-thread.inline-thread .comment:nth-child(5) {margin:0px 0px 5px 20%;} /* Level 5 */
.comment .comment-thread.inline-thread .comment:nth-child(4) {margin:0px 0px 5px 15%;} /* Level 4 */
.comment .comment-thread.inline-thread .comment:nth-child(3) {margin:0px 0px 5px 10%;} /* Level 3 */
.comment .comment-thread.inline-thread .comment:nth-child(2) {margin:0px 0px 5px 5%; } /* Level 2 */
.comment .comment-thread.inline-thread .comment:nth-child(1) {margin:0px 0px 5px 0%; } /* Level 1 */
#comments .avatar-image-container img{border:2}
.comment-thread{color:#111}
.comment-thread a{color:#2F4F4F}
.comment-thread ol{margin:0 0 20px}
- Nếu bạn đang sử dụng một trong các style giao diện Thread Comment(Duy Pham) thì chỉ cần thêm nguyên đoạn mã màu vàng trên vào trước thẻ ]]></b:skin> trong template.
Bước 3: Save lại và thử comments xem có pro hơn trước không nhé!
Di chuyển ghi chú nhận xét theo khung nhận xét khi reply đây là thủ thuật của bác Duy Pham.
Các bước thực hiện.
Bước 1: Tìm trong template thẻ
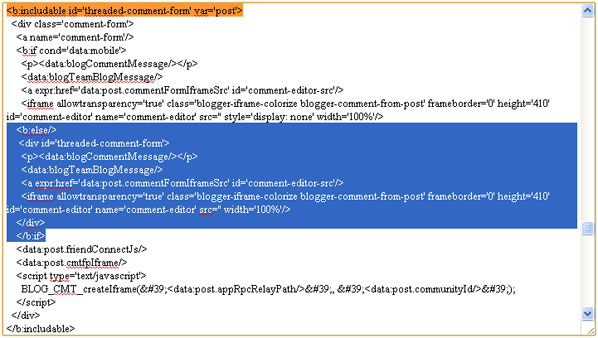
<b:includable id='threaded-comment-form' var='post'>. 
Mã hàm
threaded-comment-form trước khi thay thếTại hàm
threaded-comment-form này thay thế thẻ <b:else/> bằng đoạn mã dưới đây: <b:else/>
<div id='threaded-comment-form'>Thay thế thẻ
</b:if> bằng đoạn mã dưới đây: </div>
</b:if>
Mã hàm
threaded-comment-form sau khi thay thếBước 2: Thay thế đoạn mã
document.getElementById(domId).insertBefore(replybox, null);trong template của bạn bằng đoạn mã dưới đây: document.getElementById(domId).insertBefore(document.getElementById('threaded-comment-form'), null);Các bước trên là nhóm những thành phần cần di chuyển theo khung nhận xét vào cùng thẻ<div>vớiidlà threaded-comment-form và khai báo lại hàminsertBefore. Thủ thuật đã xong!
- Trên đây là các bước cơ bản các bạn có thể tùy chỉnh css theo phong cách riêng của bạn.
- Để tránh bị vỡ khung comment các bạn nên xóa tất cả những đoạn css có dạng #comments...đi,chỉ để lại đoạn mình hướng dẫn thôi.
- Bạn nên sao lưu Template để tránh trường hợp bị lỗi,bằng cách nhấp vào liên kết Mẫu => Sao lưu/Khôi phục => Tải về .
Chúc các bạn thành công.


0 nhận xét:
Đăng nhận xét